How to Replace a Lamp Socket Quickly – DIY
 Welcome to the first Wealth Bytes DIY post! In my new house update, I told you I was going to be adding some new do it yourself content in order to help those looking to save some cash and learn a few things. Yes, that is me in the video above. I am a huge DIY advocate. I think you can learn so much while trying to accomplish tasks on your own. I fix my own cars, build fences, fix plumbing, run electrical, and have moderate carpentry skills. If something comes up in my house, I am going to try to build or repair it on my own. Why not? I have saved thousands by doing things on my own. Not only that, but I have learned valuable skills. Today, I am going to show you how to replace a lamp socket. Why is this one first? Well, here is the back story and how to do it.
Oops! My Fault
The only reason I am showing you how to repair a lamp socket is because I broke our lamp socket. Yep, I might fix things, but I also break my share of household items. This was purely an accident and came about when my wife and I were dealing with ridding our room of two red wasps. They were buzzing around and were very agitated. They were attracted to our floor lamp and kept going in there. In an effort to get them out, I grabbed the socket to wrap them in a cloth and squash them. Well, I don’t know my own strength as I pulled the socket right out of the lamp and broke it. Damn! Luckily, I know how to fix one, so here we go.
How to Replace a Lamp Socket
Instead of buying a new lamp, why not try to replace the socket. Your lamp works on a basic socket switch. They are cheap to replace and easy as well. My lamp cost about $40 and I didn’t want a new one. It is a good lamp. So, instead of giving in and heading to the lamp store, I decided to go to the home improvement store. I picked up a basic socket for only $2.30. Yep, that is some serious savings. If you can’t find one at your local home improvement store, then check out Amazon. They have a great selection. You can get free shipping if you are an Amazon Prime member. Get a free 30-day Prime trial by going here.
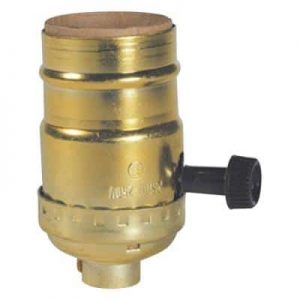
Before you start this project, you need to know which socket you have. Look at your lamp and see where the switch is located. Is is on the side? Is it a switch that toggles through the entire socket or is is on the bottom? Most lamps use only three different switches. Ours uses the basic turn switch socket and isn’t a three-way socket. This makes it really easy to replace and cheaper. Just make sure to check your lamp before heading to the store. Mine looks like the one at the top of this page.
Step 1 – Unplug the lamp
Step 2 – Remove the light bulb and take off the glass. This may involve unscrewing a simple plastic retailer and then pulling the glass off.
Step 3 – Unscrew the socket switch if you have one that screws on the side.
Step 4 – Pull out the lamp socket
Step 5 – Loosen the screws which hold the wires.
Step 6 – Remove the wires, but mark them to understand which ones go where on the new socket. If you only have two wires, this is easy to do.
Step 7 – Loosen the screws on the new socket
Step 8 – Wrap the wires onto the appropriate screw and then tighten the screw. Make sure none of the bare wires are touching each other.
Step 9 – Do steps 1 -4 in reverse order.
Step 10 – Plug the lamp back in and enjoy!
You can watch my 5 minute video on how I replaced my lamp socket. It was really easy and would have taken me less time if I didn’t have to speak on video. Unfortunately I broke my microphone in the move, so the sound is a little messed up. I will get it fixed for the next video, I promise!

Have you ever replaced a lamp socket before? Do you like or mind doing electrical work in your house?
Very cool to see that it was a relatively simple fix. I’ve never replaced a lamp socket, though I’ve done plenty of things of similar level so I’m sure I could do it just fine. I’ll do some minor electrical, but nothing too extravagant. Thankfully our next door neighbor is an electrician so I can go to him for help if need be.
It is a super easy fix. The best part is I saved over $37 doing the fix instead of giving in to buy a new lamp.
Good tip, it’s amazing how easy some repairs can be if you take just a few minutes to understand them. The company where I work pays an electrician $30 per electrical outlet to replace them with white ones, and I replaced 6 outlets and 2 switches at my house this weekend in an hour. It’s simple, and I saved myself about $230!
Wow, that is a good fee to get just for replacing outlets. I did that at my old house and it takes about 2 minutes for each one. The longest time is spent figuring out the electrical panel and which switch turns off the power to the specific side of the house!
I have never broken a lamp socket, so I didn’t even know it was something you could replace. I love DIY stuff like this because the “old me” would have instantly gone out and purchased a new lamp. The “new me” would just google “how to replace a lamp socket” and would find your video. Thanks for sharing Grayson! 🙂
Most people assume you have to just replace the entire lamp! Nope…My old self would have just purchased a new lamp, but the new Grayson will fix it and apparently video himself doing so.
I have never needed to replace a lamp socket, personally. However, that does not mean I won’t in the future!! Thanks for the tips 🙂
This was my first time attempting to do one. I know electrical work, so this looked and was simple!
Dude, that video would have been WAY better if it’d been plugged in. Electric!
Yeah, it could have happened. It was midnight when I taped it, so who knows what could have happened.
Hey Grayson, thanks for sharing. I’m bad when it comes to wasps…deathly afraid and I’m allergic. I could imagine if there were 2 of them flying in my room, I’d break something running away! Also, I’ve thrown away a couple of lamps because of socket issues, I had no idea it’s this easy to fix. Thanks again!
I could imagine if I were allergic. I just didn’t like them. They were aggressive little bastards. Glad I could share and now you can fix the next one that breaks!
yes this is very simple to do. My friend wanted to have more lighting on his garage and we made a bunch of DIY lamps by getting a few sockets and plugs from old lamps. We had to cut some cables, but that’s nothing electrical tape can’t fix.
Nothing wrong with a little DIY lighting! I have done that before in the past. So simple and cheap.
“I think you can learn so much while trying to accomplish tasks on your own.” I couldn’t agree more. Cool video.
Thank you! I appreciate your support.
Cool – thanks for the tutorial. I didn’t realize it was this simple. I’m sure I’ll be able to use this tip down the road. Thanks Grayson!
You are most welcome Derek!
These are wonderful tips and easy to implement. I also love to do the fix the things on my own and I’ve broken things more than I fixed.
Ok. I don’t see a video. Only written instructions. ??
Fixed. Sorry about that.